Wednesday, 28 February 2018

Still Image

Week 1:

As an introduction to still image (Photography) we looked at artists who specialise in portraits in roder to get inspiration for our own photographs. We first looked at Laurie Simmons, she is an American artist, photographer and filmmaker. Since the mid-1970s, Simmons has staged scenes for her camera with dolls, ventriloquist dummies, objects on legs, and people, to create photographs that reference domestic scenes. I particularly like her 'How we see' 2015 project (figure 1) where he has a variety of models showing all different facial expressions in the form of close ups in front of a bright coloured background. This collection of images is very intriguing and eye-catching. 


Figure 1


We then looked at Weegee's photographs, Weegee worked in ManhattanNew York City's Lower East Side, as a press photographer during the 1930s and 1940s, and he developed his signature style by following the city's emergency services and documenting their activity.Much of his work depicted unflinchingly realistic scenes of urban life, crime, injury and death (Figure 2). Weegee published photographic books and also worked in cinema, initially making his own short films and later collaborating with film directors such as Jack Donohue and Stanley Kubrick.


Figure 2


FInally we looked at Rbert Doisneau, he was a French photographer. In the 1930s he made photographs on the streets of Paris. He was a champion of humanist photography and with Henri Cartier-Bresson a pioneer of photojournalism. During his long career, his poetic approach to street photography recorded French everyday life (figure 3) in often playful and surreal images. Always charmed by his subjects, he enjoyed finding amusing juxtapositions or oddities of human nature. His photography follows an almost Candid style.


Figure 3

 After looking at some artists and their work we were set a task of experimenting with our own portraits. We tested a variety of different ways in which you can capture potraits both groups and individual portraits. We also looked at different backgrounds and lights that can change the whole dimension of an image. These were some of the seetings used to take out images that I learnt from the session...


Week 2:

We went to central london to visit three photography galleries, Amanda Wilkinsom gallery, Firth street gallery and Richard Saltoun Gallery. Out of the three galleries we visited, the one that interested me the most was 'women look at women' at the Richard Saltoun gallery (figure 4). Out of all the galleries, this particular collection of images in this gallery was extremely intriguing. In my opinion Saltoun  wated to display images specifically about women looking at themselves and other women through the camera lens and challenging what we see because women are always being categorized.

Image result for richard saltoun gallery london

Figure 4

                                   
This image by Rose English (Figure 5) shows a young woman on top of a bed, wearing an enormous horse’s tail. With her hair perfectly tied and her ribs protruding through her narrow, bare back, there’s something suggestive about these poses, but also comfortingly subversive and surreal. It’s a great example of more obscure images that feed into an established practice, as English is celebrated for her performance and video works that obsess over equine movement.
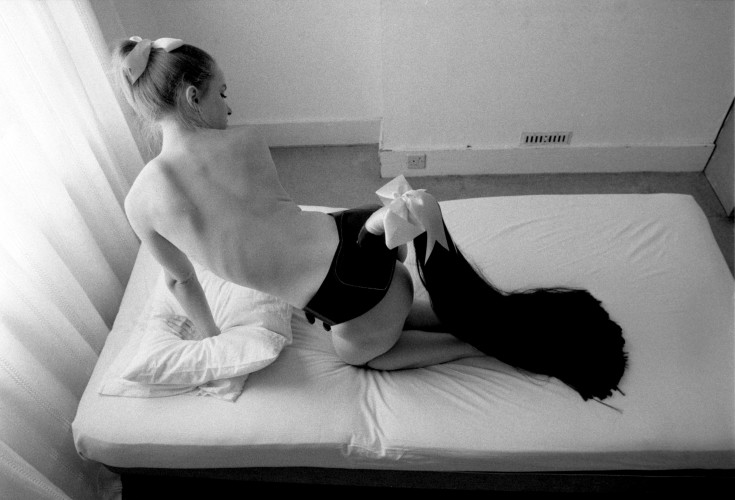
                                     
                               
                                                                         Figure 5


In this image by Alexis Hunter (Figure 6) twenty hand-coloured images depict the point of view of a woman poised at a typewriter before she begins to fiddle with a small globe. As she tears the object apart her hands become cut and bloodied, in a frustrating and seemingly pointless act. This form of aggression alludes to the stifling professional confines many women endured during the seventies (and remain relatable today) and also hint at forms of mania that have often been aligned with female emotions.


                                                                      Figure 6

Overall, the visit to all of the galleries has extremely helped me with inspiration and has shown me the variety in which portraits can be ctaken, it has also widened my knowledge of portrait photograpy as a whole. Our homeowrk task was to go out either in pairs or individually and pratice taking some photographs of our own.


Homework Task: 


I partnered up with my friend Arnold and we decided to choose street photography as our theme. We used Arnold's friend as a model and after gaining inspiration from artists we looked at during this topic we decided to constantly switch scenary and capture diffefrent emotions from our model. We also varied our shots including, mid shots, long shots and close ups. We decided to keep editing minimal as sometimes it can distract the audience froim the meaning of the picture. Therfore we only brightened tones and blurred backgrounds in order to have constant focus on the model. Overall, I was very happy with the shoot and feel as though the pictires came out as planned.


          Final image of the shoot:


This was my favourite image from the shoot. I kept the editing simple and lowered the depth of feild in the background keeing all emphisis on the model. The emotion on his face also tells his own personal story, leaving it with the imagination of the viewer. 

Moving Image

Week 1:


In the first session we learnt how you get ideas for moving image projects on to the screen. Before anything is commissioned or funded a pre production stage takes place where ideas are developed and clarified ready to shoot.  Once there is a clear creative vision for a project the practical, logistical and technical aspects have to be planned. In groups we were asked to produce a pre production package based on a short drama script provided. It involved working through the essential practical and creative stages of preparing a project ready to shoot. 

In our groups we worked through the process of visualizing the appropriate style for the script, creating a detailed treatment including images and references.


During the class session we were given the tools to breakdown a script and idedntify the key elements required to create the essential management paperwork.  


 Homwork task:


Week 2:

In our groups we divided roles including:

-Acting
-Lightng
-Sound
-Filming
-Editing

We were then shown the scipt for a short scene from fight club, and I took the initiative to be the actor and main protagonist. After breifely learning the script it was time to get into my role !

                                                                        The Script:


We decided to take a different approach compared to other groups. At the end of Fight Club we find out that Jack and Tyler are actually the same person and Jack is just a figment of Tyler's imagination. Therefore, we decided to make myself act as both Jack and Tyler as we wanted to differentiate  the scene as much as possible from the origional.


Our Fight Club scene:


Behind the scenes (set-up):


Week 3:


Our final task was to read through a film script called 'Clay'. We were then split into groups and had to create two powerpoints (clay treatment and Production management) that allowed us to get an insight into the pre - production stage of a film. Within our groups we divided roles for each powerpoint. 

         
         Clay treatment from Giordano Boscarelli


Web Design

Week 1:

In the first session we were shown the basics of web media, what is it and how it works. I learnt that six media characteristics (strengths) of the web are:

-many-to-many networking
-multimedia
-database
-automation
-live and/or time-shifted
-location-independent and/or device-independent

No single characteristic is unique to the web, but the web is the only single medium to incorporate all six.


                                            Simple diagram of how the internet works: 


HTML is the standard markup language for creating Web pages.

-HTML stands for Hyper Text Markup Language
- HTML describes the structure of Web pages using markup
- HTML elements are the building blocks of HTML pages
- HTML elements are represented by tags
- HTML tags label pieces of content such as "heading", "paragraph", "table", and so on
- Browsers do not display the HTML tags, but use them to render the content of the page


                    HTML Tags HTML tags are element names surrounded by angle brackets:

                                         <tagname> content goes here... </tagname> 

                                     HTML tags normally come in pairs like <p> and </p>


- The first tag in a pair is the start tag, the second tag is the end tag
- The end tag is written like the start tag, but with a forward slash inserted before the tag name

                                                     
                                                       HTML page structure:


-HTML headings are defined with the <h1> to <h6> tags.
-HTML paragraphs are defined with the <p> tags.
- HTML links are defined with the <a> tag.


At the end of the session we were set a homework task to create a hotglue page using all of our knowledge gained from the lesson.


Week 2:

On the second and final week of Web Design, out hotglue pages were due. Considering I only had minimal knowledge of how to use hotglue and how to code I was happy with the outcome of my page.  https://gio123.hotglue.me

Later in the session we were taught other codes including how to add background colours and change fonts that would help make our hotglue pages look better in the future.


New coding information learnt from the session:

- CSS stands for Cascading Style Sheets
- CSS describes how HTML elements are to be displayed on screen, paper, or in other media
- CSS saves a lot of work. It can control the layout of multiple web pages all at once
- External stylesheets are stored in CSS files


- The element selector selects elements based on the element name.
- You can select all <p>  elements on a page like this (in this case, all <p>
elements will be center-aligned, with a red text color)


Comments are used to explain the code, and may help when you edit the source code at a later date.

Comments are ignored by browsers.

A CSS comment starts with/* and ends with */


There are three ways of inserting a style sheet:

-External style sheet
- Internal style sheet, method used by hotglue
- Inline style

The CSS background properties are used to define the background effects for elements. CSS background properties:

-background-color
- background-image
- background-repeat
- background-attachment
- Background-position


                                                    (Experimenting with background images)


                                                (experimenting with colout, text and images)